DeepLink
注册
需要支持 DeepLink 的页面,在注册时需要传入第三个参数
import Navigation from 'hybrid-navigation';

Navigation.registerComponent('TopBarStyle', () => TopBarStyle, {
  path: '/topBarStyle/:who',
  dependency: 'Options',
});
这个参数是个对象,一共有三个可选项
path 表示路径,其中冒号开头的片段表示参数,这些参数将会通过 props 传递给目标页面。
dependency 表示前置页面,譬如一个详情页可能会依赖一个列表页,当点击返回按钮时,会回到列表页。这个选项可以确定依赖链。看 example 中的例子:
Navigation.registerComponent('Options', () => Options);
Navigation.registerComponent('TopBarStyle', () => TopBarStyle, {
  path: '/topBarStyle/:who',
  dependency: 'Options',
});
TopBarStyle 依赖 Options,当我们通过 hbd://topBarStyle/xxxx?greeting=yyyy 这样的 url 打开 TopBarStyle 页面时,会检查 app 当前的路由图,以决定是否切换到 tab Options,并在需要时补齐依赖页面。
mode 表示跳转模式,present 表示使用 navigator.present 打开目标页面, modal 表示使用 navigator.showModal 打开页面,默认是通过 push 的方式打开。
0.23.0 开始支持 queryString,queryString 不能注册在 path 中
激活
需要在应用内稳定时机激活 DeepLink(例如根布局设置完成后),并在根布局被替换时反激活。
方式一(推荐):在 Navigation.setRoot 之前通过 setRootLayoutUpdateListener 统一处理,避免在页面生命周期里重复激活/反激活。
import Navigation, { DeepLink } from 'hybrid-navigation';

// 在 setRoot 之前注册:willSetRoot 时反激活,didSetRoot 时激活
Navigation.setRootLayoutUpdateListener(
  () => DeepLink.deactivate(),
  () => DeepLink.activate('hbd://'),
);

Navigation.setRoot(rootLayout);
方式二(不推荐):在入口页面的生命周期中激活。该方式在多入口或根布局替换时容易重复注册监听;当前 example 已改为方式一。若沿用此方式,需确保只在一处调用,且与 setRoot 时机协调。
拦截
有时我们需要拦截默认的跳转行为
router 对象为我们提供了注册和移除拦截器的一对方法
router.addInterceptor(interceptor): void
router.removeInterceptor(interceptor): void
import { router } from 'hybrid-navigation';
router.addInterceptor(func);
router.removeInterceptor(func);
func 是一个接收 path 为参数,返回 boolean | Promise<boolean> 的函数,返回 true 表示拦截。
type RouteInterceptor = (path: string) => boolean | Promise<boolean>;
iOS 配置
在 iOS 工程(例如 ios/<AppName>/AppDelegate.mm)中,先引入:
#import <React/RCTLinkingManager.h>
并实现 URL Scheme 回调:
- (BOOL)application:(UIApplication *)application
            openURL:(NSURL *)url
            options:(NSDictionary<UIApplicationOpenURLOptionsKey,id> *)options {
  return [RCTLinkingManager application:application openURL:url options:options];
}
如果需要支持 Universal Links,再补充如下方法:
- (BOOL)application:(UIApplication *)application
continueUserActivity:(NSUserActivity *)userActivity
  restorationHandler:(void (^)(NSArray<id<UIUserActivityRestoring>> * _Nullable))restorationHandler {
  return [RCTLinkingManager application:application
                   continueUserActivity:userActivity
                     restorationHandler:restorationHandler];
}
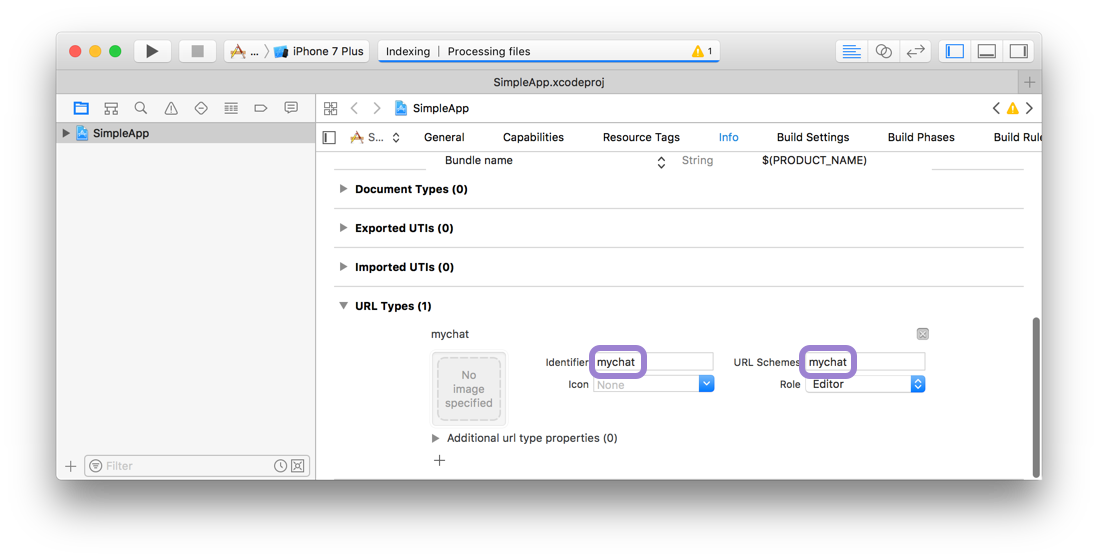
然后在 Xcode 中打开工程,进入 Target -> Info -> URL Types,新增一条 URL Type,并把 Scheme 设置为你的协议头(例如 hbd)。
Android 配置
在 Android 工程的 android/app/src/main/AndroidManifest.xml 中,给 MainActivity 增加如下 intent-filter:
<intent-filter>
    <action android:name="android.intent.action.VIEW" />
    <category android:name="android.intent.category.DEFAULT" />
    <category android:name="android.intent.category.BROWSABLE" />
    <data android:scheme="hbd" />
</intent-filter>
MainActivity 的
launchMode需要设置为singleTask。
测试
具体可以参考 example 这个项目中相关配置
可以在终端中通过以下两个命令分别测试 iOS 和 Android 的效果
iOS:
xcrun simctl openurl booted "hbd://topBarStyle/xxxx?greeting=yyyy"
Android:
adb shell am start -W -a android.intent.action.VIEW -d "hbd://topBarStyle/xxxx?greeting=yyyy"