集成到以 RN 为主的项目
本文档适用于 hybrid-navigation 3.x(React Native >= 0.83,新架构)。
你想用 React Native 实现大部分业务,原生代码主要起到搭桥的作用。
假设你是通过 npx @react-native-community/cli init MyApp 创建的项目,目录结构是这样的:
MyApp/
├─ android/
├─ ios/
├─ node_modules/
├─ package.json
添加依赖
npm install hybrid-navigation --save
# or
yarn add hybrid-navigation
RN 项目配置
打开 index.js 这个文件,通常,它就在 package.json 旁边。
以前,你是这么注册 React 组件
import { AppRegistry } from 'react-native';
import App from './App';
import { name as appName } from './app.json';

AppRegistry.registerComponent(appName, () => App);
现在,你需要像下面那样
import Navigation, { BarStyleDarkContent } from 'hybrid-navigation';
import App from './App';

// 配置全局样式
Navigation.setDefaultOptions({
  statusBarStyle: BarStyleDarkContent,
});

// 重要必须
Navigation.startRegisterComponent();

// 注意,你的每一个页面都需要注册
Navigation.registerComponent('App', () => App);

// 重要必须
Navigation.endRegisterComponent();

// 通过 Navigation.setRoot 设置 UI 层级
Navigation.setRoot({
  stack: {
    children: [{ screen: { moduleName: 'App' } }],
  },
});
setRoot 具体用法请查看 Navigation.setRoot
另外有一个需要注意的地方,hybrid-navigation 接管了状态栏,如果代码里面有使用 <StatusBar /> 组件,需要移除。
- <StatusBar barStyle={isDarkMode ? 'light-content' : 'dark-content'} />
支持 Redux
想要为每个页面都注入相同的属性,可以利用 Navigation.startRegisterComponent() 这个方法,它接受一个 HOC 作为参数。
想要支持 Redux,像下面这样配置即可
function withRedux(WrappedComponent) {
  return class ReduxProvider extends React.Component {
    // 注意复制 navigationItem
    static navigationItem = (WrappedComponent as any).navigationItem
    static displayName = `withRedux(${WrappedComponent.displayName})`

    render() {
      return (
        <Provider store={store}>
          {/* 注意传递 props 属性 */}
          <WrappedComponent {...this.props} />
        </Provider>
      )
    }
  }
}

Navigation.startRegisterComponent(withRedux)
其中 withRedux 就是一个 HOC
Android 项目配置
修改 MainActivity.java 文件
- import com.facebook.react.ReactActivity;
+ import com.reactnative.hybridnavigation.ReactAppCompatActivity;

- public class MainActivity extends ReactActivity {
+ public class MainActivity extends ReactAppCompatActivity {
-     @Override
-     protected String getMainComponentName() {
-        return "MyApp";
-     }
  }
修改后一般长下面这个样子:
package com.myapp69;

import com.reactnative.hybridnavigation.ReactAppCompatActivity;

public class MainActivity extends ReactAppCompatActivity {
    // 空空如也
}
修改 MainApplication.java 文件
  import com.facebook.react.ReactNativeHost;
+ import com.reactnative.hybridnavigation.ReactManager;

  public void onCreate() {
      super.onCreate();
      ReactNativeApplicationEntryPoint.loadReactNative(this);

+     ReactManager reactManager = ReactManager.get();
+     reactManager.install(getReactHost());
  }
运行项目后,页面顶部请统一使用 RN TopBar 组件,并通过 statusBarStyle / statusBarHidden 控制状态栏,避免在页面里直接使用 <StatusBar />。
iOS 项目配置
更新 pod 依赖
cd ios && pod install
修改 AppDelegate.h 文件,修改后大概长下面这个样子
#import <UIKit/UIKit.h>

@interface AppDelegate : UIResponder <UIApplicationDelegate>

@property (strong, nonatomic) UIWindow *window;

@end
修改 AppDelegate.mm 文件,修改后大概长下面这个样子
#import "AppDelegate.h"

#import <React-RCTAppDelegate/RCTDefaultReactNativeFactoryDelegate.h>
#import <React-RCTAppDelegate/RCTReactNativeFactory.h>
#import <ReactAppDependencyProvider/RCTAppDependencyProvider.h>

#import <React/RCTLinkingManager.h>
#import <React/RCTBundleURLProvider.h>
#import <React/RCTLog.h>
#import <React/RCTDevMenu.h>

#import <HybridNavigation/HybridNavigation.h>
#import "ExampleHybridViewController.h" // 仅当你需要注册原生模块时

@interface ReactNativeDelegate : RCTDefaultReactNativeFactoryDelegate

@end

@implementation ReactNativeDelegate

- (NSURL *)bundleURL {
#if DEBUG
	return [[RCTBundleURLProvider sharedSettings] jsBundleURLForBundleRoot:@"index"];
#else
	return [[NSBundle mainBundle] URLForResource:@"main" withExtension:@"jsbundle"];
#endif
}

@end


@interface AppDelegate () <HBDReactBridgeManagerDelegate>

@property (strong, nonatomic) RCTRootViewFactory *rootViewFactory;
@property (strong, nonatomic) id<RCTReactNativeFactoryDelegate> reactNativeDelegate;
@property (strong, nonatomic) RCTReactNativeFactory *reactNativeFactory;

@end

@implementation AppDelegate

- (BOOL)application:(UIApplication *)application didFinishLaunchingWithOptions:(NSDictionary *)launchOptions {
    RCTSetLogThreshold(RCTLogLevelInfo);

	ReactNativeDelegate *delegate = [[ReactNativeDelegate alloc] init];
	RCTReactNativeFactory *factory = [[RCTReactNativeFactory alloc] initWithDelegate:delegate];
	delegate.dependencyProvider = [[RCTAppDependencyProvider alloc] init];

	self.reactNativeDelegate = delegate;
	self.reactNativeFactory = factory;
	self.rootViewFactory = factory.rootViewFactory;

	[self.rootViewFactory initializeReactHostWithLaunchOptions:launchOptions bundleConfiguration:[RCTBundleConfiguration defaultConfiguration] devMenuConfiguration:[RCTDevMenuConfiguration defaultConfiguration]];
	[[HBDReactBridgeManager get] installWithReactHost:self.rootViewFactory.reactHost];

    // register native modules
    [[HBDReactBridgeManager get] registerNativeModule:@"NativeModule" forViewController:[ExampleHybridViewController class]];

    UIStoryboard *storyboard = [UIStoryboard storyboardWithName:@"LaunchScreen" bundle:nil];
    UIViewController *rootViewController = [storyboard instantiateInitialViewController];
    self.window.windowLevel = UIWindowLevelStatusBar + 1;
    self.window.rootViewController = rootViewController;
    [self.window makeKeyAndVisible];
    return YES;
}

- (void)reactModuleRegisterDidCompleted:(HBDReactBridgeManager *)manager {

}

@end
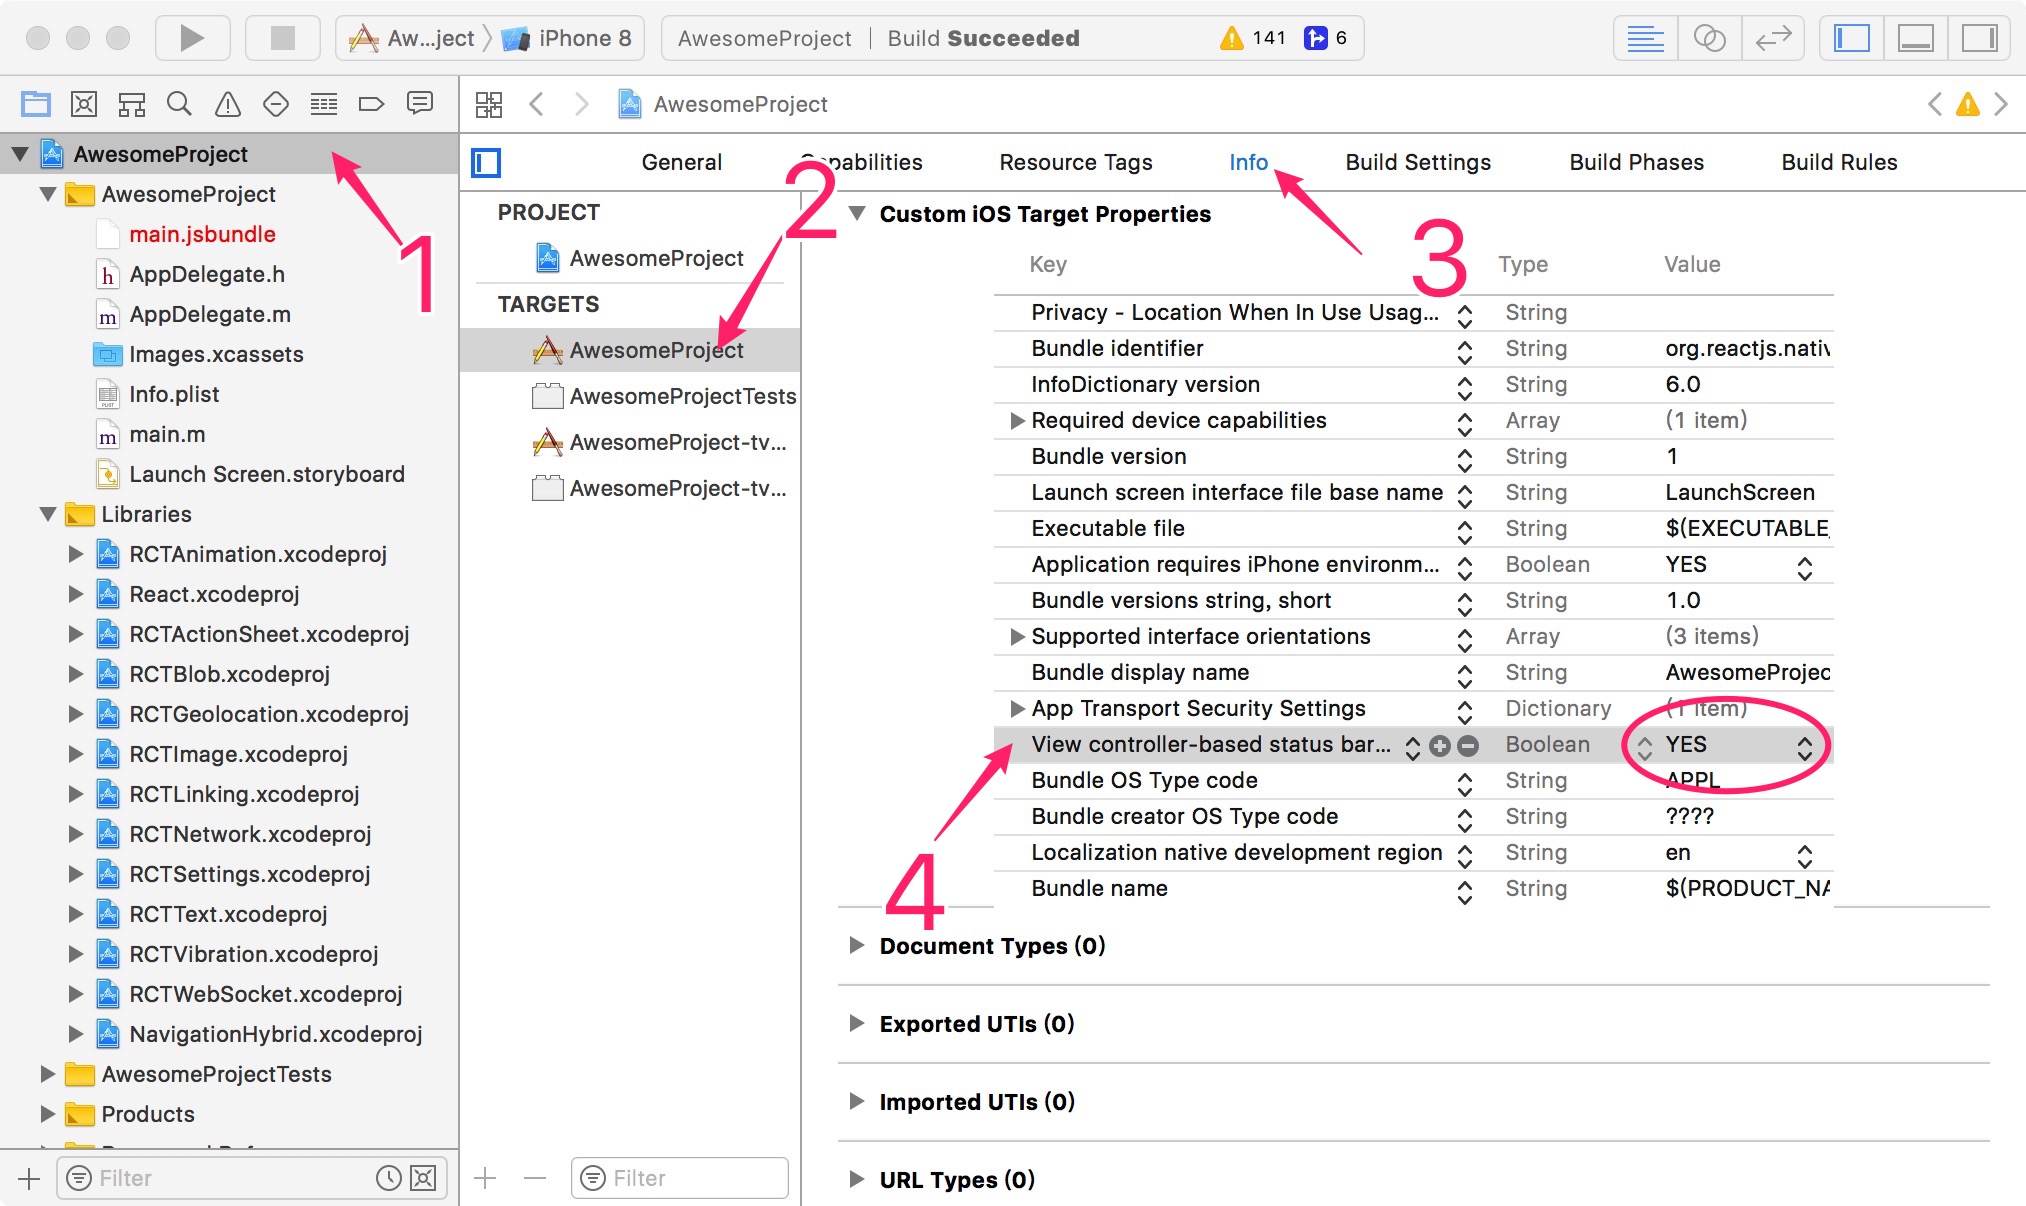
修改 Info.plist 文件
运行项目,如果出现关于状态栏的错误提示,请检查并移除页面内直接使用的 <StatusBar /> 组件,统一改为 Navigation options 控制。
关于闪屏
可参考 example 项目中的两处配置:
- Android:
android/app/src/main/java/com/reactnative/hybridnavigation/example/MainActivity.java - iOS:
ios/HybridNavigation/LaunchScreen.storyboard